Home > Europe > United Kingdom > England > London > Bridges > London Bridge
The Railway at Mafeking (b / w photo)
")
![]()
Wall Art and Photo Gifts from Fine Art Finder
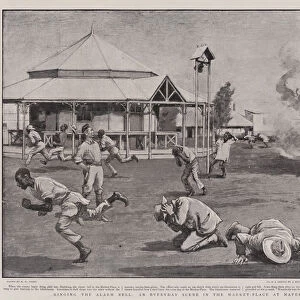
The Railway at Mafeking (b / w photo)
1592819 The Railway at Mafeking (b/w photo) by English Photographer, (19th century); Private Collection; (add.info.: The Railway at Mafeking. Illustration for The Illustrated London News, 4 November 1899.
English Photographer (19th Century)); Look and Learn / Illustrated Papers Collection
Media ID 22824754
© Look and Learn / Illustrated Papers Collection / Bridgeman Images
Course Of Construction Engine Mafeking Railway Bridge Second Boer War Workshop Workshops
FEATURES IN THESE COLLECTIONS
> Africa
> Related Images
> Africa
> South Africa
> Related Images
> Arts
> Landscape paintings
> Waterfall and river artworks
> River artworks
> Europe
> United Kingdom
> England
> London
> Bridges
> London Bridge
> Europe
> United Kingdom
> England
> London
> Transport
> Railway
> Fine Art Finder
> Artists
> English Photographer
> Popular Themes
> Railway Posters
The Railway at Mafeking
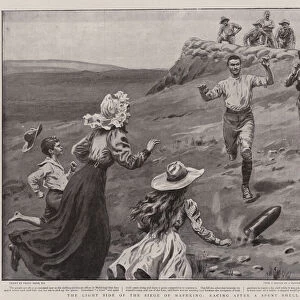
EDITORS COMMENTS
is a captivating photograph captured by an English photographer in the 19th century. This print, now part of a private collection, showcases the railway infrastructure during the Second Boer War in South Africa. The image transports us back to a pivotal moment in history, where Mafeking was under siege and its railways played a crucial role. The railway sheds stand tall against the backdrop of an expansive landscape, symbolizing resilience amidst adversity. The engine parked on the tracks signifies hope for progress even in times of conflict. This photograph offers us a glimpse into the course of construction as we witness workers diligently building and maintaining this vital transportation network. Every detail holds importance - from the workshop bustling with activity to the sturdy railway bridge spanning over Macloutsie River. Colonel Plumer's force can be imagined utilizing these railways for strategic purposes during their defense efforts. It serves as a reminder that even amidst war, life continues with determination and resourcefulness. Through this remarkable piece of photography, we are transported to Mafeking at a critical juncture in history. It allows us to appreciate not only its historical significance but also highlights how art can capture moments that shape our world forever.
MADE IN THE USA
Safe Shipping with 30 Day Money Back Guarantee
FREE PERSONALISATION*
We are proud to offer a range of customisation features including Personalised Captions, Color Filters and Picture Zoom Tools
SECURE PAYMENTS
We happily accept a wide range of payment options so you can pay for the things you need in the way that is most convenient for you
* Options may vary by product and licensing agreement. Zoomed Pictures can be adjusted in the Cart.